12 To 6 Volt Battery Conversion
A re-VOLTing experience
The problem of finding a battery to
fit many early motorcycles can be a tough one. A very limited number of
6 volt motorcycle batteries are being manufactured today. The dimensions
of those that are rarely fit the dimension of an antique motorcycle’s battery
box. The result is that you usually resort to running a smaller (sometimes
much smaller) than normal battery just to have something in the battery
box. Running a smaller battery than normal creates two problems. First,
because of the lack of battery amp/hour capacity, your lights will not
be as bright as they should or will grow dim sooner than normal. Secondly,
your generator is much more likely to overcharge the little battery, severely
reducing its life expectancy.
An easy and economical way to make
a 6 volt battery that will come very close to filling your battery box,
is to convert a 12 volt battery. Dozens of different sizes are available
from your local motorcycle or power equipment dealer. All you need to do
is select a suitable donor. The resulting 6 volt battery, while extremely
functional, wins no awards for original appearance. For this reason the
conversion is best suited to machines that use an enclosed battery box.
It can also be used with a replica battery shell or hollowed out original
battery with a little ingenuity.
How are we going to do this you ask?
Well its not alchemy, but it’s almost as valuable as turning lead into
gold. Essentially, you’ll be sawing a perfectly good, brand new 12 volt
lead/acid battery in half to make a 6 volt! All motorcycle type batteries
are divided into cells. Each cell produces approximately 2.1 volts. So
actually a 12 volt battery produces about 12.6 volts - cut in half you’ll
end up with a 6.3 volt battery.
A few words of caution first. Only
use a new battery that has never had acid in it. Battery (sulfuric) acid
is nasty stuff that can cause serious injury to you and your motorcycle.
Use only a lead/acid battery, not use a “gel” or any other super-duper
modern type battery. Whenever you’re handling acid, always wear approved
safety goggles, rubber gloves and protective clothing. Work in a well ventilated
space, preferably outdoors.
The first thing you need to do is measure
the dimensions of your battery box or case. You will be selecting 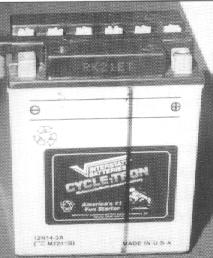 a
battery that when cut, will yield about 3-3/4 cells that will fill the
box as completely as the original. The fourth cell is where the battery
will be cut and the plates removed. This allows some flexibility in fitting
the battery to the dimensions of the case.
a
battery that when cut, will yield about 3-3/4 cells that will fill the
box as completely as the original. The fourth cell is where the battery
will be cut and the plates removed. This allows some flexibility in fitting
the battery to the dimensions of the case.
Donor battery showing approximate location of cut
You will want a new 12 volt battery
that is almost as tall as the box (leaving a little room for a battery
pad on the bottom and connections on top) and width to just fit inside
the box. The battery’s length should be just a little less than twice the
length of the box or shell, so that when cut through the fourth cell it
will be the correct length to fit inside.
With your battery box dimensions in
hand, go down to your friendly neighborhood motorcycle shop and ask to
look at their 12 volt battery charts. These will show the dimensions of
each battery as well as the terminal types and locations. Keep in mind
that the new battery’s length is divided into 6 equal sized cells, you
should select one that when cut near the outer edge of the fourth cell
will render the 6 volt size you need. It needs to be cut near the outer
edge of the fourth cell to leave room for the new terminal connection on
the interconnecting link.
Be sure to tell your dealer not to
put acid in the battery. New batteries are usually shipped with a sealed
container of acid, make sure you get it along with the battery. While the
dealer may think he is doing you a service by filling and charging it,
in reality he will have ruined it for your purpose.
Now that you have your battery on the bench, look
at it carefully. One end should have a vent on it.
This 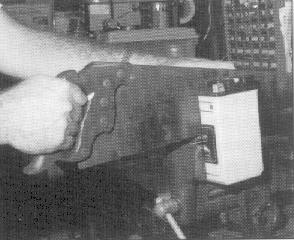 is
to allow gasses to safely escape when charging and in the event of a spill,
allow acid to drain safely away from the battery box. It makes no difference
whether you cut off the positive or negative end, but you must have the
vent on the part you will be using. Take a marker and carefully draw a
line where you want to make your cut. Double check your measurements. Remember
the old carpenter's adage -"measure twice, cut once". Gently but
firmly hold the battery in a vice (or if your assistant trusts you, hold
it firmly by hand). Get your hand saw out and carefully cut the battery
in two. The plastic shell will cut easily as well as the internal lead
connecting link.
is
to allow gasses to safely escape when charging and in the event of a spill,
allow acid to drain safely away from the battery box. It makes no difference
whether you cut off the positive or negative end, but you must have the
vent on the part you will be using. Take a marker and carefully draw a
line where you want to make your cut. Double check your measurements. Remember
the old carpenter's adage -"measure twice, cut once". Gently but
firmly hold the battery in a vice (or if your assistant trusts you, hold
it firmly by hand). Get your hand saw out and carefully cut the battery
in two. The plastic shell will cut easily as well as the internal lead
connecting link.
A hand saw cuts through the battery with ease
Voila’! You now have two batteries.
Inside you will see alternating layers of plates remaining in both halves.
Set aside the 2-1/4 cell part, you won't have much use for it. The lead
plates will be attached to the interconnecting link by small tabs. Take
a pair of wire cutters and carefully clip the lead plates away from the
link.
If you made the cut at the outer edge
of the fourth cell, there should be about 1/2" - 3/4" of 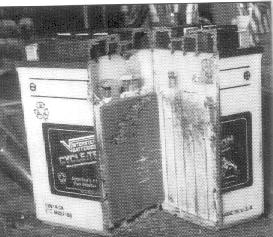 interconnecting
link protruding from the wall of the third cell. The shape and exact location
of this link may vary with manufacturers, but all batteries will have it.
Drill a 3/16" hole for a #10 screw through the protruding link. This will
be where the new terminal lead is attached.
interconnecting
link protruding from the wall of the third cell. The shape and exact location
of this link may vary with manufacturers, but all batteries will have it.
Drill a 3/16" hole for a #10 screw through the protruding link. This will
be where the new terminal lead is attached.
Looking at the freshly cut end, you
should see a ventway that runs the length of the battery across the top.
Your saw cut right through it. This ventway must be sealed at the cut end
to prevent acid from leaking out. Mix up a little epoxy and carefully fill
the opening. Use just enough to seal the end. Too much and it will seep
into the third cell, ruining it.
Now for the terminal leads. A two
conductor trailer wire connector is an easy way to make a quick disconnect.
The one I use is rated at 20 amps, as is the inline fuse holder. This doesn't
mean use a 20 amp fuse. Rather, use a fuse rated just a little over
your motorcycle’s maximum electrical load or generator's maximum rated
output, whichever is greater. For example my 101 Scout's Splitdorf generator
puts out a maximum of 5 1/4 amps, which is a little more than what the
headlight and taillight draw. A horn can draw anywhere from 2 to 5 amps
depending type, so be sure to take this into account. In this case I decided
to use a 7.5 amp fuse.
Solder a #10 ring terminal to one
end of the fuse holder lead. Feed one of the quick connect leads through 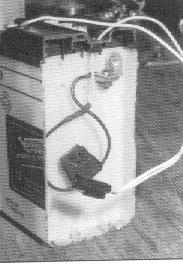 the
unused fourth cell filler hole and solder it to the other fuse holder lead.
Use shrink tubing to insulate all soldered connections. Solder a terminal
to the remaining quick connect lead in order to attach it to the battery's
other terminal. Connect your new leads with new hardware and coat the terminals
with battery anti-corrosion gel. Solder the other half of the quick connect
to the bike's hot and ground wires, making sure they match the polarity
of the battery’s leads.
the
unused fourth cell filler hole and solder it to the other fuse holder lead.
Use shrink tubing to insulate all soldered connections. Solder a terminal
to the remaining quick connect lead in order to attach it to the battery's
other terminal. Connect your new leads with new hardware and coat the terminals
with battery anti-corrosion gel. Solder the other half of the quick connect
to the bike's hot and ground wires, making sure they match the polarity
of the battery’s leads.
You may recall that when you first cut the battery
in two, there was some dark powder or sediment in the bottom of the battery
cell. This was residue from the insulating plates. As time goes on, the
plates will continue to deteriorate primarily due to vibration, leaving
this residue. Before adding the acid, remove all the caps and turn the
battery upside down and gently shake the residue out of all the cells.
This will help extend the life of your new battery.
The completed 6 volt conversion
You are now ready to add the acid.
Take the battery outside to a safe location. Put on rubber gloves and safety
goggles. Follow the manufacturers instructions for filling the cells with
acid and charging.
For less than about $30.00 you have a new 6 volt
battery that should last several seasons if properly care for. Happy trails.